
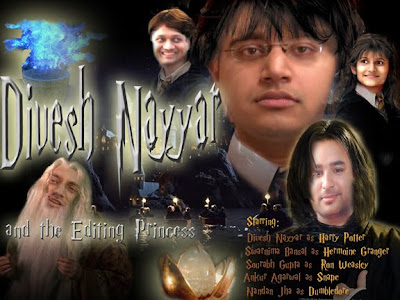
The above image shows you characters of Harry Potter being represented by my friends.
- Harry Potter movie name has been changed keeping intact the same text Font with light effects behind it.
- Characters’ faces have been replaced by that of my friends’ keeping the hair-do and style same
- Star cast has been added in the same famous Harry Potter Font style
- Objects like Goblet of Fire, Golden Egg etc. are present
How to create:
This image has been created by using
1. A Background image, images showing other characters of the movie
2. Related objects
3. The Font for the Movie which can be downloaded and installed.
· Taking the background image and deleting the Text- Movie name using Clone Stamping tool.
· Opened other images which had other characters in them namely- Harry Potter, Hermoine, Ron, Snape, and Dumbledore.
·
Selecting the characters from the individual images by selection tools like Quick Selection or Magnetic Lasso tool (you can use any other tool according to the ease of use) and copy and then paste them to the original background layer
· Arranged them according to choice and adjusted accordingly.
· Now similarly copied the relevant objects like the Goblet of Fire, Golden Egg etc. from other images and pasting it on the working image. Opened the image from which the faces of the friends can be taken. Copied the Face of the person and paste it to the working image on a layer just above the layer of the character which was to be replaced with this person. Now linked these two layers by the Link icon on the layer’s palette.
·
Erase the additional areas from the friend’s face layer (erasing should be done with a soft eraser brush which can be done by “SHIFT + [”). Soft brush will give it a faded, realistic look.
· The face might be required to transform using Free Transform (CTRL + T) to fit into the character’s face.
·
Did this for all the characters by picking up old photographs and copied their faces to paste it over the movie characters.
· When the faces/objects copied have different lighting conditions, a respective adjustment layer (e.g. Hue/Saturation or Brightness/Contrast) was added just above that particular layer and clipped the adjustment layer with the layer below, so that the adjustment made is applied only to the layer clipped, i.e. the object or face copied.
· Selecting the Font installed, put in the Movie name and star cast. Changed the color to the relevant color.
·
Gradient can also be applied to the text. For this, we need to type the text with Type Mask tool onto a new layer. Create a new layer by clicking on the New layer icon on the Layers palette.From the Layer Styles in the Effects palette I applied the relevant Bevel layer style.For the smaller font sizes, I edited the settings from Layer > Layer Style > Style Settings…
·
Now Position the texts in the image properly to give a natural view and so as not to hide any face by the text.
· Select the text layer and apply the Outer Glow to the layers from Layer > Layer style > Style settings…
Finally, I got this image with my friends depicting the Famous Harry Potter characters with the Movie name based on them!!!
Base image-Stage 1:

Harry Potter and characters on it -Stage 2:


.jpg)