Creating High-Tone Effect in Portraits using Adobe Photoshop Lightroom || Post-Processing Tips


Today, some of the friends were discussing some portraits shared at - http://webneel.com/webneel/blog/22-most-beautiful-portrait-photographs-regina-pagles-inspiring-showcase and a discussion started on probable ways of achieving these kinds of effects in Portraits. Of-course, there can be multiple ways of simulating this kind of effect in Photoshop and Lightroom. Here I was going to discuss one of the easy ways to achieving this...Photographs you see on shared link are well shot, by keeping in mind the post-processing strategy and that is the key in whole Photography workflow. If we want to post-process a photograph, there should be proper plan for shooting it in right way so that final style goes with the mood of lighting. Here I am ignoring the fact about per-visualizing a portrait and lighting used to shoot. Let's directly jump on the basic elements we see in these photographs and ways to achieve theMost of these photographs give fake-HDR look with quite polished texture on face and cloths. Of-course, different types of texture is kept in various elements of the frame. E.g. - Faces are bright, soft but have some texture... Hairs are crisp and more details as compared to normal portraits and this effects looks good with grey & brown hairs. So let's discuss the quick process of achieving some part of it in Lightroom..1. Open your Photograph in Lightroom and go to Develop Module.2. First goal is to neutralize the tones of this photograph and then target each portion as per specific needs. By neutralize I mean - extracting details from each part of the photograph. Which means, extracting details from shadows by adding Fill-Light (Shadows), Recovering details form Highlighs and playing with Whites/Blacks. Just notice the image below and changes done. Values will vary from one photograph to another, so don't give much attention to the numbers you see for different slidersMoving these four sliders will make your photograph something like above, where we see most of the elements in mid-tone and comparatively less contrast. Depending upon original Photograph, you may nee to use Exposure, Contrast and Clarity at this point of time. For above photograph, I don't see any need to using anything else in Basic section of Develop Module in Lightroom.In case, you played with these four sliders and still feel that tones are neutralized yet, CURVES can be extremely helpful in that case. In fact you can redefine ranges of Highlights & Shadows there, so more flexibility in playing with photo-tones. 3. When we are done with Neutralizing tones of a portrait photograph, now it's time to work on different parts. Here I am going to work on skin and Hairs only by skipping cloths...4. Skin Work : Now I selected Adjustment Brush and painted the skin area in face. Some parts of the face are painted with high intensity to ensure that finally we get symmetrical effect of changes we do. Strokes may vary from one photograph to another and taste of photographer.Now just have a look at sliders highlighted. I have quickly done it, didn't give much attention to the values I needed. But basic idea was to reduce Clarity for adding softness to face and increasing sharpness at the same time, to retain some texture. Probably for girls/kids, I will not sharpen too much. Apart from that Highlights are intensified and light is added to shadows. Contrast is also reduced. So just play with these slider and decide the kind of the lighting/texture you need in skin.5. Now, it is time to work on hairs in this photographs : Just check out the image below. Again a new Adjustment Brush is selected and all areas with hairs is painted. Then Clarity is increased as well as Sharpness, as we wanted to have crisp texture. Now, you need to decide the difference and intensity you want here. Depending upon the color of hairs, you may want to play with Shadows & Highlights.After working on all hairs, I realized that DOF effect on hairs is varying in different parts, so thought of processing them separately as well. Just have a look at images below to have a idea about it...Which means that highlighted parts get added processing at compared to head. So this whole business of selection and intensity of effect as per your choice and original photograpAfter doing all this, I was still feeling the need of sharpness in some parts of the potraits. So chose to use another Adjustment-Brush Instance for sharpening purpose. Here I selected all Hairs, eyebrows & eye-balls. So in above photograph, only these changes are done. Further you may need to play with HSL (Hue-Saturation-Luminance) in case some of the colors need to be DE-saturated. For such processing, Color-Luminance can be better than Color-Saturation...So just, try it out with your photographs and comments back in case there is any specific query about the same.

Today, some of the friends were discussing some portraits shared at - http://webneel.com/webneel/blog/22-most-beautiful-portrait-photographs-regina-pagles-inspiring-showcase and a discussion started on probable ways of achieving these kinds of effects in Portraits. Of-course, there can be multiple ways of simulating this kind of effect in Photoshop and Lightroom. Here I was going to discuss one of the easy ways to achieving this...

(Photo-Credits - Amit Sharma, Model - Jeetendra)

Photographs you see on shared link are well shot, by keeping in mind the post-processing strategy and that is the key in whole Photography workflow. If we want to post-process a photograph, there should be proper plan for shooting it in right way so that final style goes with the mood of lighting. Here I am ignoring the fact about per-visualizing a portrait and lighting used to shoot. Let's directly jump on the basic elements we see in these photographs and ways to achieve them

Most of these photographs give fake-HDR look with quite polished texture on face and cloths. Of-course, different types of texture is kept in various elements of the frame. E.g. - Faces are bright, soft but have some texture... Hairs are crisp and more details as compared to normal portraits and this effects looks good with grey & brown hairs. So let's discuss the quick process of achieving some part of it in Lightroom...

1. Open your Photograph in Lightroom and go to Develop Module.

2. First goal is to neutralize the tones of this photograph and then target each portion as per specific needs. By neutralize I mean - extracting details from each part of the photograph. Which means, extracting details from shadows by adding Fill-Light (Shadows), Recovering details form Highlighs and playing with Whites/Blacks. Just notice the image below and changes done. Values will vary from one photograph to another, so don't give much attention to the numbers you see for different sliders.

Today, some of the friends were discussing some portraits shared at - http://webneel.com/webneel/blog/22-most-beautiful-portrait-photographs-regina-pagles-inspiring-showcase and a discussion started on probable ways of achieving these kinds of effects in Portraits. Of-course, there can be multiple ways of simulating this kind of effect in Photoshop and Lightroom. Here I was going to discuss one of the easy ways to achieving this...Photographs you see on shared link are well shot, by keeping in mind the post-processing strategy and that is the key in whole Photography workflow. If we want to post-process a photograph, there should be proper plan for shooting it in right way so that final style goes with the mood of lighting. Here I am ignoring the fact about per-visualizing a portrait and lighting used to shoot. Let's directly jump on the basic elements we see in these photographs and ways to achieve theMost of these photographs give fake-HDR look with quite polished texture on face and cloths. Of-course, different types of texture is kept in various elements of the frame. E.g. - Faces are bright, soft but have some texture... Hairs are crisp and more details as compared to normal portraits and this effects looks good with grey & brown hairs. So let's discuss the quick process of achieving some part of it in Lightroom..1. Open your Photograph in Lightroom and go to Develop Module.2. First goal is to neutralize the tones of this photograph and then target each portion as per specific needs. By neutralize I mean - extracting details from each part of the photograph. Which means, extracting details from shadows by adding Fill-Light (Shadows), Recovering details form Highlighs and playing with Whites/Blacks. Just notice the image below and changes done. Values will vary from one photograph to another, so don't give much attention to the numbers you see for different slidersMoving these four sliders will make your photograph something like above, where we see most of the elements in mid-tone and comparatively less contrast. Depending upon original Photograph, you may nee to use Exposure, Contrast and Clarity at this point of time. For above photograph, I don't see any need to using anything else in Basic section of Develop Module in Lightroom.In case, you played with these four sliders and still feel that tones are neutralized yet, CURVES can be extremely helpful in that case. In fact you can redefine ranges of Highlights & Shadows there, so more flexibility in playing with photo-tones. 3. When we are done with Neutralizing tones of a portrait photograph, now it's time to work on different parts. Here I am going to work on skin and Hairs only by skipping cloths...4. Skin Work : Now I selected Adjustment Brush and painted the skin area in face. Some parts of the face are painted with high intensity to ensure that finally we get symmetrical effect of changes we do. Strokes may vary from one photograph to another and taste of photographer.Now just have a look at sliders highlighted. I have quickly done it, didn't give much attention to the values I needed. But basic idea was to reduce Clarity for adding softness to face and increasing sharpness at the same time, to retain some texture. Probably for girls/kids, I will not sharpen too much. Apart from that Highlights are intensified and light is added to shadows. Contrast is also reduced. So just play with these slider and decide the kind of the lighting/texture you need in skin.5. Now, it is time to work on hairs in this photographs : Just check out the image below. Again a new Adjustment Brush is selected and all areas with hairs is painted. Then Clarity is increased as well as Sharpness, as we wanted to have crisp texture. Now, you need to decide the difference and intensity you want here. Depending upon the color of hairs, you may want to play with Shadows & Highlights.After working on all hairs, I realized that DOF effect on hairs is varying in different parts, so thought of processing them separately as well. Just have a look at images below to have a idea about it...Which means that highlighted parts get added processing at compared to head. So this whole business of selection and intensity of effect as per your choice and original photograpAfter doing all this, I was still feeling the need of sharpness in some parts of the potraits. So chose to use another Adjustment-Brush Instance for sharpening purpose. Here I selected all Hairs, eyebrows & eye-balls. So in above photograph, only these changes are done. Further you may need to play with HSL (Hue-Saturation-Luminance) in case some of the colors need to be DE-saturated. For such processing, Color-Luminance can be better than Color-Saturation...So just, try it out with your photographs and comments back in case there is any specific query about the same.

Moving these four sliders will make your photograph something like above, where we see most of the elements in mid-tone and comparatively less contrast. Depending upon original Photograph, you may nee to use Exposure, Contrast and Clarity at this point of time. For above photograph, I don't see any need to using anything else in Basic section of Develop Module in Lightroom.

In case, you played with these four sliders and still feel that tones are neutralized yet, CURVES can be extremely helpful in that case. In fact you can redefine ranges of Highlights & Shadows there, so more flexibility in playing with photo-tones. 

3. When we are done with Neutralizing tones of a portrait photograph, now it's time to work on different parts. Here I am going to work on skin and Hairs only by skipping cloths...

4. Skin Work : Now I selected Adjustment Brush and painted the skin area in face. Some parts of the face are painted with high intensity to ensure that finally we get symmetrical effect of changes we do. Strokes may vary from one photograph to another and taste of photographer.

Today, some of the friends were discussing some portraits shared at - http://webneel.com/webneel/blog/22-most-beautiful-portrait-photographs-regina-pagles-inspiring-showcase and a discussion started on probable ways of achieving these kinds of effects in Portraits. Of-course, there can be multiple ways of simulating this kind of effect in Photoshop and Lightroom. Here I was going to discuss one of the easy ways to achieving this...Photographs you see on shared link are well shot, by keeping in mind the post-processing strategy and that is the key in whole Photography workflow. If we want to post-process a photograph, there should be proper plan for shooting it in right way so that final style goes with the mood of lighting. Here I am ignoring the fact about per-visualizing a portrait and lighting used to shoot. Let's directly jump on the basic elements we see in these photographs and ways to achieve theMost of these photographs give fake-HDR look with quite polished texture on face and cloths. Of-course, different types of texture is kept in various elements of the frame. E.g. - Faces are bright, soft but have some texture... Hairs are crisp and more details as compared to normal portraits and this effects looks good with grey & brown hairs. So let's discuss the quick process of achieving some part of it in Lightroom..1. Open your Photograph in Lightroom and go to Develop Module.2. First goal is to neutralize the tones of this photograph and then target each portion as per specific needs. By neutralize I mean - extracting details from each part of the photograph. Which means, extracting details from shadows by adding Fill-Light (Shadows), Recovering details form Highlighs and playing with Whites/Blacks. Just notice the image below and changes done. Values will vary from one photograph to another, so don't give much attention to the numbers you see for different slidersMoving these four sliders will make your photograph something like above, where we see most of the elements in mid-tone and comparatively less contrast. Depending upon original Photograph, you may nee to use Exposure, Contrast and Clarity at this point of time. For above photograph, I don't see any need to using anything else in Basic section of Develop Module in Lightroom.In case, you played with these four sliders and still feel that tones are neutralized yet, CURVES can be extremely helpful in that case. In fact you can redefine ranges of Highlights & Shadows there, so more flexibility in playing with photo-tones. 3. When we are done with Neutralizing tones of a portrait photograph, now it's time to work on different parts. Here I am going to work on skin and Hairs only by skipping cloths...4. Skin Work : Now I selected Adjustment Brush and painted the skin area in face. Some parts of the face are painted with high intensity to ensure that finally we get symmetrical effect of changes we do. Strokes may vary from one photograph to another and taste of photographer.Now just have a look at sliders highlighted. I have quickly done it, didn't give much attention to the values I needed. But basic idea was to reduce Clarity for adding softness to face and increasing sharpness at the same time, to retain some texture. Probably for girls/kids, I will not sharpen too much. Apart from that Highlights are intensified and light is added to shadows. Contrast is also reduced. So just play with these slider and decide the kind of the lighting/texture you need in skin.5. Now, it is time to work on hairs in this photographs : Just check out the image below. Again a new Adjustment Brush is selected and all areas with hairs is painted. Then Clarity is increased as well as Sharpness, as we wanted to have crisp texture. Now, you need to decide the difference and intensity you want here. Depending upon the color of hairs, you may want to play with Shadows & Highlights.After working on all hairs, I realized that DOF effect on hairs is varying in different parts, so thought of processing them separately as well. Just have a look at images below to have a idea about it...Which means that highlighted parts get added processing at compared to head. So this whole business of selection and intensity of effect as per your choice and original photograpAfter doing all this, I was still feeling the need of sharpness in some parts of the potraits. So chose to use another Adjustment-Brush Instance for sharpening purpose. Here I selected all Hairs, eyebrows & eye-balls. So in above photograph, only these changes are done. Further you may need to play with HSL (Hue-Saturation-Luminance) in case some of the colors need to be DE-saturated. For such processing, Color-Luminance can be better than Color-Saturation...So just, try it out with your photographs and comments back in case there is any specific query about the same.

Now just have a look at sliders highlighted. I have quickly done it, didn't give much attention to the values I needed. But basic idea was to reduce Clarity for adding softness to face and increasing sharpness at the same time, to retain some texture. Probably for girls/kids, I will not sharpen too much. Apart from that Highlights are intensified and light is added to shadows. Contrast is also reduced. So just play with these slider and decide the kind of the lighting/texture you need in skin.

5. Now, it is time to work on hairs in this photographs : Just check out the image below. Again a new Adjustment Brush is selected and all areas with hairs is painted. Then Clarity is increased as well as Sharpness, as we wanted to have crisp texture. Now, you need to decide the difference and intensity you want here. Depending upon the color of hairs, you may want to play with Shadows & Highlights.

Today, some of the friends were discussing some portraits shared at - http://webneel.com/webneel/blog/22-most-beautiful-portrait-photographs-regina-pagles-inspiring-showcase and a discussion started on probable ways of achieving these kinds of effects in Portraits. Of-course, there can be multiple ways of simulating this kind of effect in Photoshop and Lightroom. Here I was going to discuss one of the easy ways to achieving this...Photographs you see on shared link are well shot, by keeping in mind the post-processing strategy and that is the key in whole Photography workflow. If we want to post-process a photograph, there should be proper plan for shooting it in right way so that final style goes with the mood of lighting. Here I am ignoring the fact about per-visualizing a portrait and lighting used to shoot. Let's directly jump on the basic elements we see in these photographs and ways to achieve theMost of these photographs give fake-HDR look with quite polished texture on face and cloths. Of-course, different types of texture is kept in various elements of the frame. E.g. - Faces are bright, soft but have some texture... Hairs are crisp and more details as compared to normal portraits and this effects looks good with grey & brown hairs. So let's discuss the quick process of achieving some part of it in Lightroom..1. Open your Photograph in Lightroom and go to Develop Module.2. First goal is to neutralize the tones of this photograph and then target each portion as per specific needs. By neutralize I mean - extracting details from each part of the photograph. Which means, extracting details from shadows by adding Fill-Light (Shadows), Recovering details form Highlighs and playing with Whites/Blacks. Just notice the image below and changes done. Values will vary from one photograph to another, so don't give much attention to the numbers you see for different slidersMoving these four sliders will make your photograph something like above, where we see most of the elements in mid-tone and comparatively less contrast. Depending upon original Photograph, you may nee to use Exposure, Contrast and Clarity at this point of time. For above photograph, I don't see any need to using anything else in Basic section of Develop Module in Lightroom.In case, you played with these four sliders and still feel that tones are neutralized yet, CURVES can be extremely helpful in that case. In fact you can redefine ranges of Highlights & Shadows there, so more flexibility in playing with photo-tones. 3. When we are done with Neutralizing tones of a portrait photograph, now it's time to work on different parts. Here I am going to work on skin and Hairs only by skipping cloths...4. Skin Work : Now I selected Adjustment Brush and painted the skin area in face. Some parts of the face are painted with high intensity to ensure that finally we get symmetrical effect of changes we do. Strokes may vary from one photograph to another and taste of photographer.Now just have a look at sliders highlighted. I have quickly done it, didn't give much attention to the values I needed. But basic idea was to reduce Clarity for adding softness to face and increasing sharpness at the same time, to retain some texture. Probably for girls/kids, I will not sharpen too much. Apart from that Highlights are intensified and light is added to shadows. Contrast is also reduced. So just play with these slider and decide the kind of the lighting/texture you need in skin.5. Now, it is time to work on hairs in this photographs : Just check out the image below. Again a new Adjustment Brush is selected and all areas with hairs is painted. Then Clarity is increased as well as Sharpness, as we wanted to have crisp texture. Now, you need to decide the difference and intensity you want here. Depending upon the color of hairs, you may want to play with Shadows & Highlights.After working on all hairs, I realized that DOF effect on hairs is varying in different parts, so thought of processing them separately as well. Just have a look at images below to have a idea about it...Which means that highlighted parts get added processing at compared to head. So this whole business of selection and intensity of effect as per your choice and original photograpAfter doing all this, I was still feeling the need of sharpness in some parts of the potraits. So chose to use another Adjustment-Brush Instance for sharpening purpose. Here I selected all Hairs, eyebrows & eye-balls. So in above photograph, only these changes are done. Further you may need to play with HSL (Hue-Saturation-Luminance) in case some of the colors need to be DE-saturated. For such processing, Color-Luminance can be better than Color-Saturation...So just, try it out with your photographs and comments back in case there is any specific query about the same.
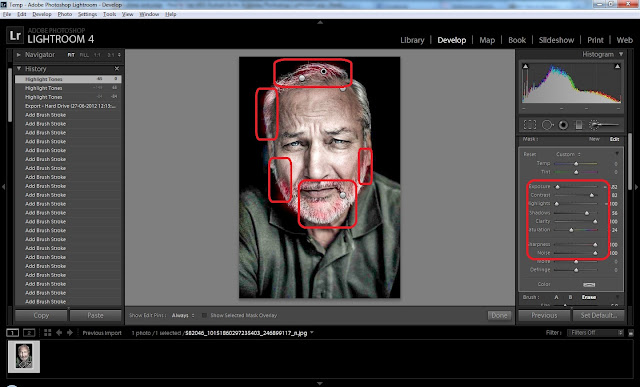
After working on all hairs, I realized that DOF effect on hairs is varying in different parts, so thought of processing them separately as well. Just have a look at images below to have a idea about it...

Today, some of the friends were discussing some portraits shared at - http://webneel.com/webneel/blog/22-most-beautiful-portrait-photographs-regina-pagles-inspiring-showcase and a discussion started on probable ways of achieving these kinds of effects in Portraits. Of-course, there can be multiple ways of simulating this kind of effect in Photoshop and Lightroom. Here I was going to discuss one of the easy ways to achieving this...Photographs you see on shared link are well shot, by keeping in mind the post-processing strategy and that is the key in whole Photography workflow. If we want to post-process a photograph, there should be proper plan for shooting it in right way so that final style goes with the mood of lighting. Here I am ignoring the fact about per-visualizing a portrait and lighting used to shoot. Let's directly jump on the basic elements we see in these photographs and ways to achieve theMost of these photographs give fake-HDR look with quite polished texture on face and cloths. Of-course, different types of texture is kept in various elements of the frame. E.g. - Faces are bright, soft but have some texture... Hairs are crisp and more details as compared to normal portraits and this effects looks good with grey & brown hairs. So let's discuss the quick process of achieving some part of it in Lightroom..1. Open your Photograph in Lightroom and go to Develop Module.2. First goal is to neutralize the tones of this photograph and then target each portion as per specific needs. By neutralize I mean - extracting details from each part of the photograph. Which means, extracting details from shadows by adding Fill-Light (Shadows), Recovering details form Highlighs and playing with Whites/Blacks. Just notice the image below and changes done. Values will vary from one photograph to another, so don't give much attention to the numbers you see for different slidersMoving these four sliders will make your photograph something like above, where we see most of the elements in mid-tone and comparatively less contrast. Depending upon original Photograph, you may nee to use Exposure, Contrast and Clarity at this point of time. For above photograph, I don't see any need to using anything else in Basic section of Develop Module in Lightroom.In case, you played with these four sliders and still feel that tones are neutralized yet, CURVES can be extremely helpful in that case. In fact you can redefine ranges of Highlights & Shadows there, so more flexibility in playing with photo-tones. 3. When we are done with Neutralizing tones of a portrait photograph, now it's time to work on different parts. Here I am going to work on skin and Hairs only by skipping cloths...4. Skin Work : Now I selected Adjustment Brush and painted the skin area in face. Some parts of the face are painted with high intensity to ensure that finally we get symmetrical effect of changes we do. Strokes may vary from one photograph to another and taste of photographer.Now just have a look at sliders highlighted. I have quickly done it, didn't give much attention to the values I needed. But basic idea was to reduce Clarity for adding softness to face and increasing sharpness at the same time, to retain some texture. Probably for girls/kids, I will not sharpen too much. Apart from that Highlights are intensified and light is added to shadows. Contrast is also reduced. So just play with these slider and decide the kind of the lighting/texture you need in skin.5. Now, it is time to work on hairs in this photographs : Just check out the image below. Again a new Adjustment Brush is selected and all areas with hairs is painted. Then Clarity is increased as well as Sharpness, as we wanted to have crisp texture. Now, you need to decide the difference and intensity you want here. Depending upon the color of hairs, you may want to play with Shadows & Highlights.After working on all hairs, I realized that DOF effect on hairs is varying in different parts, so thought of processing them separately as well. Just have a look at images below to have a idea about it...Which means that highlighted parts get added processing at compared to head. So this whole business of selection and intensity of effect as per your choice and original photograpAfter doing all this, I was still feeling the need of sharpness in some parts of the potraits. So chose to use another Adjustment-Brush Instance for sharpening purpose. Here I selected all Hairs, eyebrows & eye-balls. So in above photograph, only these changes are done. Further you may need to play with HSL (Hue-Saturation-Luminance) in case some of the colors need to be DE-saturated. For such processing, Color-Luminance can be better than Color-Saturation...So just, try it out with your photographs and comments back in case there is any specific query about the same.

Which means that highlighted parts get added processing at compared to head. So this whole business of selection and intensity of effect as per your choice and original photograph.

After doing all this, I was still feeling the need of sharpness in some parts of the potraits. So chose to use another Adjustment-Brush Instance for sharpening purpose. Here I selected all Hairs, eyebrows & eye-balls. 

Today, some of the friends were discussing some portraits shared at - http://webneel.com/webneel/blog/22-most-beautiful-portrait-photographs-regina-pagles-inspiring-showcase and a discussion started on probable ways of achieving these kinds of effects in Portraits. Of-course, there can be multiple ways of simulating this kind of effect in Photoshop and Lightroom. Here I was going to discuss one of the easy ways to achieving this...Photographs you see on shared link are well shot, by keeping in mind the post-processing strategy and that is the key in whole Photography workflow. If we want to post-process a photograph, there should be proper plan for shooting it in right way so that final style goes with the mood of lighting. Here I am ignoring the fact about per-visualizing a portrait and lighting used to shoot. Let's directly jump on the basic elements we see in these photographs and ways to achieve theMost of these photographs give fake-HDR look with quite polished texture on face and cloths. Of-course, different types of texture is kept in various elements of the frame. E.g. - Faces are bright, soft but have some texture... Hairs are crisp and more details as compared to normal portraits and this effects looks good with grey & brown hairs. So let's discuss the quick process of achieving some part of it in Lightroom..1. Open your Photograph in Lightroom and go to Develop Module.2. First goal is to neutralize the tones of this photograph and then target each portion as per specific needs. By neutralize I mean - extracting details from each part of the photograph. Which means, extracting details from shadows by adding Fill-Light (Shadows), Recovering details form Highlighs and playing with Whites/Blacks. Just notice the image below and changes done. Values will vary from one photograph to another, so don't give much attention to the numbers you see for different slidersMoving these four sliders will make your photograph something like above, where we see most of the elements in mid-tone and comparatively less contrast. Depending upon original Photograph, you may nee to use Exposure, Contrast and Clarity at this point of time. For above photograph, I don't see any need to using anything else in Basic section of Develop Module in Lightroom.In case, you played with these four sliders and still feel that tones are neutralized yet, CURVES can be extremely helpful in that case. In fact you can redefine ranges of Highlights & Shadows there, so more flexibility in playing with photo-tones. 3. When we are done with Neutralizing tones of a portrait photograph, now it's time to work on different parts. Here I am going to work on skin and Hairs only by skipping cloths...4. Skin Work : Now I selected Adjustment Brush and painted the skin area in face. Some parts of the face are painted with high intensity to ensure that finally we get symmetrical effect of changes we do. Strokes may vary from one photograph to another and taste of photographer.Now just have a look at sliders highlighted. I have quickly done it, didn't give much attention to the values I needed. But basic idea was to reduce Clarity for adding softness to face and increasing sharpness at the same time, to retain some texture. Probably for girls/kids, I will not sharpen too much. Apart from that Highlights are intensified and light is added to shadows. Contrast is also reduced. So just play with these slider and decide the kind of the lighting/texture you need in skin.5. Now, it is time to work on hairs in this photographs : Just check out the image below. Again a new Adjustment Brush is selected and all areas with hairs is painted. Then Clarity is increased as well as Sharpness, as we wanted to have crisp texture. Now, you need to decide the difference and intensity you want here. Depending upon the color of hairs, you may want to play with Shadows & Highlights.After working on all hairs, I realized that DOF effect on hairs is varying in different parts, so thought of processing them separately as well. Just have a look at images below to have a idea about it...Which means that highlighted parts get added processing at compared to head. So this whole business of selection and intensity of effect as per your choice and original photograpAfter doing all this, I was still feeling the need of sharpness in some parts of the potraits. So chose to use another Adjustment-Brush Instance for sharpening purpose. Here I selected all Hairs, eyebrows & eye-balls. So in above photograph, only these changes are done. Further you may need to play with HSL (Hue-Saturation-Luminance) in case some of the colors need to be DE-saturated. For such processing, Color-Luminance can be better than Color-Saturation...So just, try it out with your photographs and comments back in case there is any specific query about the same.
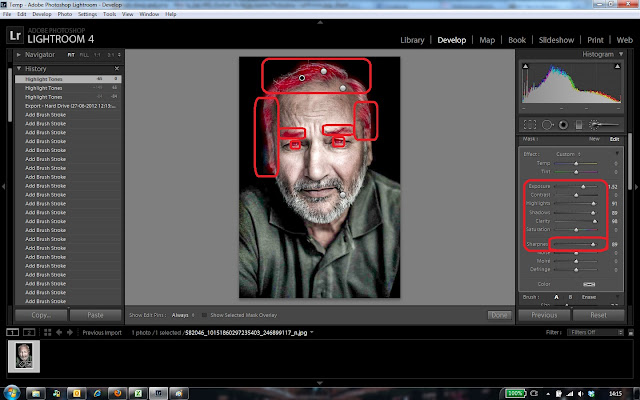
So in above photograph, only these changes are done. Further you may need to play with HSL (Hue-Saturation-Luminance) in case some of the colors need to be DE-saturated. For such processing, Color-Luminance can be better than Color-Saturation...

So just, try it out with your photographs and comments back in case there is any specific query about the same.

Trending Post Today !

How to reach Kasol/Malana and top things to do around this stunning hill-station of Himalayan State of India

Main places to see & Top things to do around Dalhousie : Stunning Hill Station in Himalayan State of India